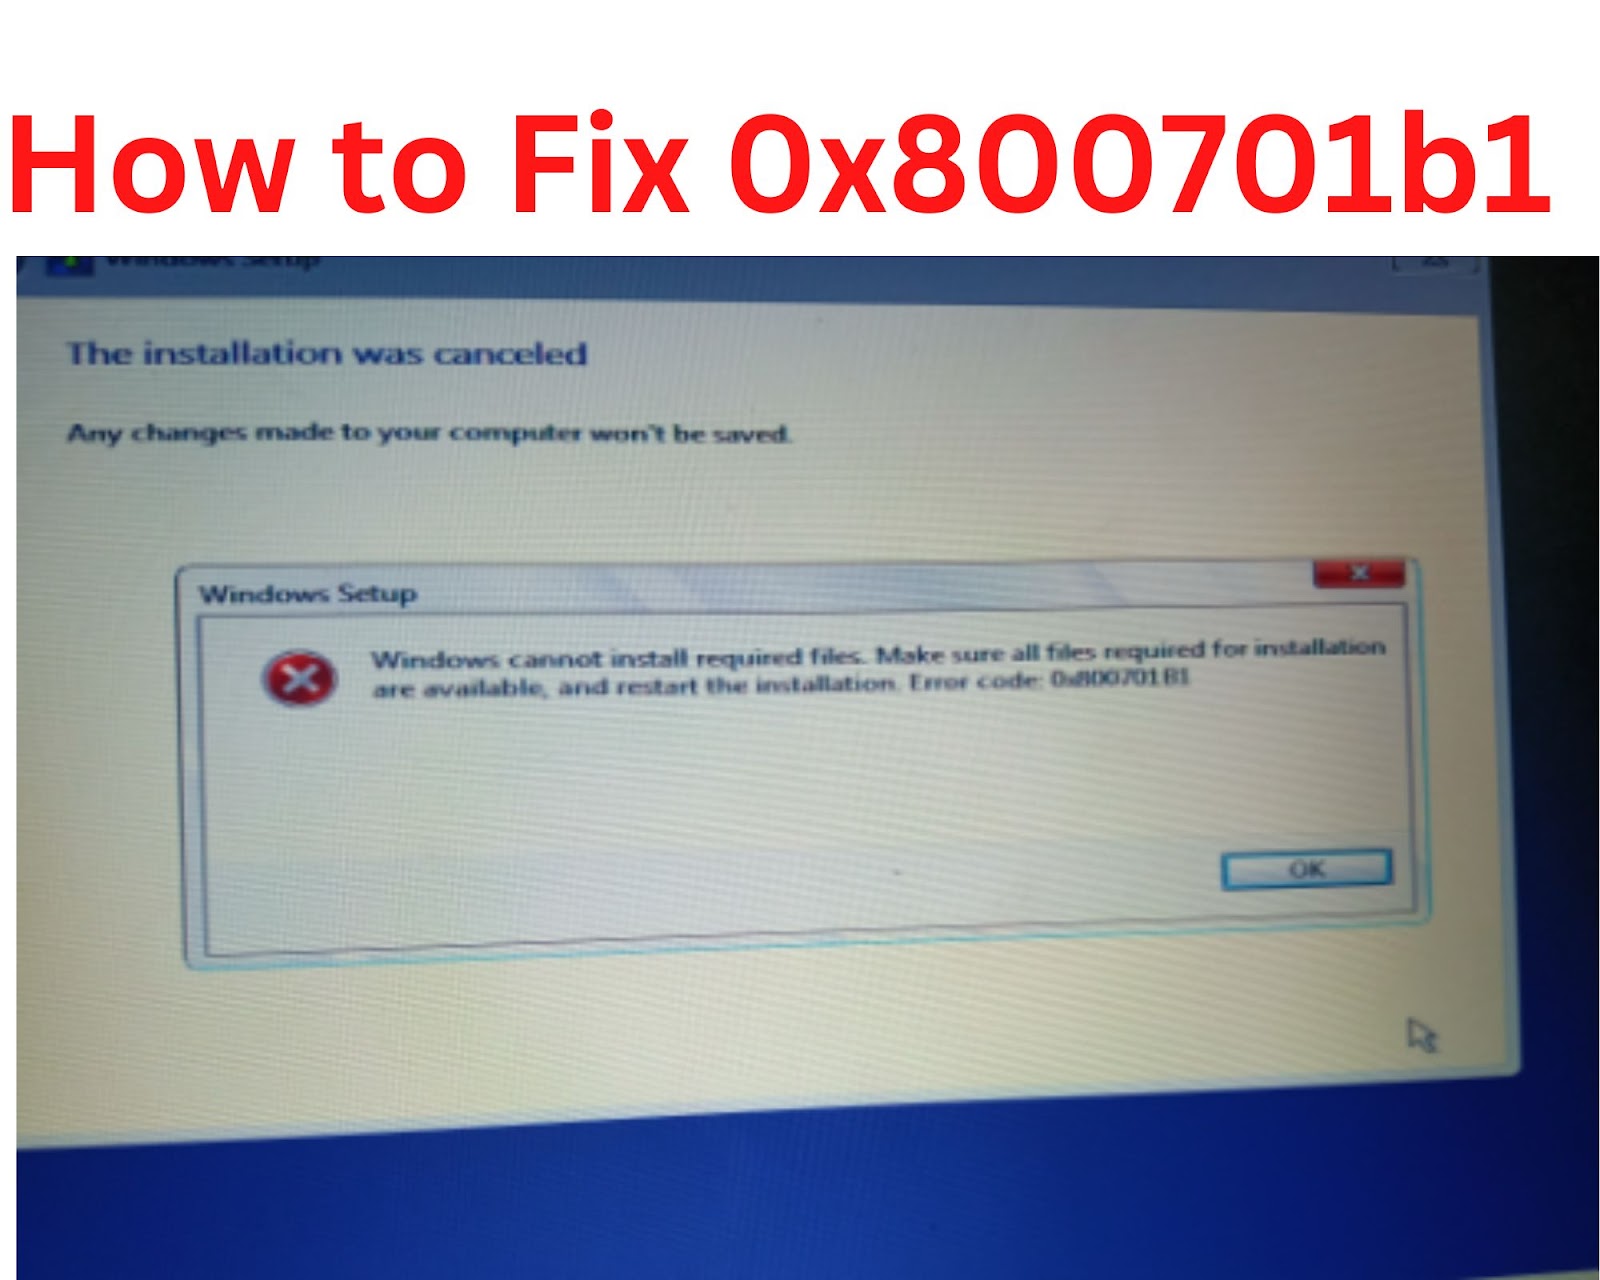
Error 0x800701b1 in Windows 10 & 11 may occur during copy/pasting of folders or files. The error means the specified device was not found.
The error can be caused by several issues, such as insufficient power or transfer speed, incompatible drivers, or a faulty boot entry.
This can be very frustrating, and it can lead to serious problems if not handled properly or fixed. It can waste your time and resources trying to learn how to solve the error.
Fortunately, several solutions are available to fix this issue quickly. This article will discuss how to fix 0x800701b1 on Windows 10/11 and the causes.
What Causes the Error 0x800701b1?
Before you get into the details on how to fix 0x800701b1, it is essential to know the suspected culprits which may be causing the error. This can help you detect what exactly causes it. Some of the culprits include:
1. Corrupted Windows System Files
Windows operating system constantly tries to update itself with new features and security patches. Sometimes, the files used for these updates can corrupt and cause this error code 0x800701b1.
2. Malware or Virus
When this error code is encountered, it means that Windows has blocked the application or file you are trying to access for some reason.
It could be a virus, malware infection, or another security issue. You should run a full computer scan with an up-to-date anti-virus program to fix this problem.
3. Inconsistent / Incompatible driver
Inconsistent or incompatible drivers can cause a variety of issues on your computer. Drivers are pieces of software that allow the operating system to communicate with hardware components such as printers, sound cards, and video cards.
When an incompatible driver is installed, it can cause problems with the hardware or other software on the computer. This can lead to errors, crashes, and even data loss.
To prevent these issues from occurring, it’s important to make sure that all of your drivers are up-to-date and compatible with your system.
You should also check for any known incompatibilities between the driver and the hardware or software you use. If you find any incompatibilities, uninstall the driver and replace it with a compatible version.
4. USB 2.0 port is insufficient
USB 2.0 ports are insufficient to provide power for certain devices, such as external hard drives. The ports only provide 4.0V of output power. This power can be insufficient.
Additionally, USB 2.0 devices may not work with USB 3.0 ports due to incorrect configurations or outdated drivers on the computer.

To fix this issue, users can try several methods, such as using Device Manager to scan for hardware changes, restarting the computer, disabling and re-enabling the USB controller, or using a regular USB 2.0 port instead of a 3.0 port.
If these methods do not work, users may need to get a new display and attempt to use a different USB port for the item they are trying to utilize or reinstall the Universal Serial Bus (USB) controllers in Device Manager to resolve the issue of “Not Enough USB Controller Resources” error on Windows 10 computers.
5. Insufficient PSU Output
Insufficient PSU output means your computer’s power supply unit (PSU) is not providing enough power to support all the connected devices.
This can be caused by having too many devices connected to your computer or an inadequate PSU for your needs.

It’s important to note that faulty USB ports can also cause this error, incompatible or inconsistent drivers, bad Windows updates, and files or folder ownership changes to which you don’t have access.
Read More:
How to Fix Windows Update Error 0x80072ee2
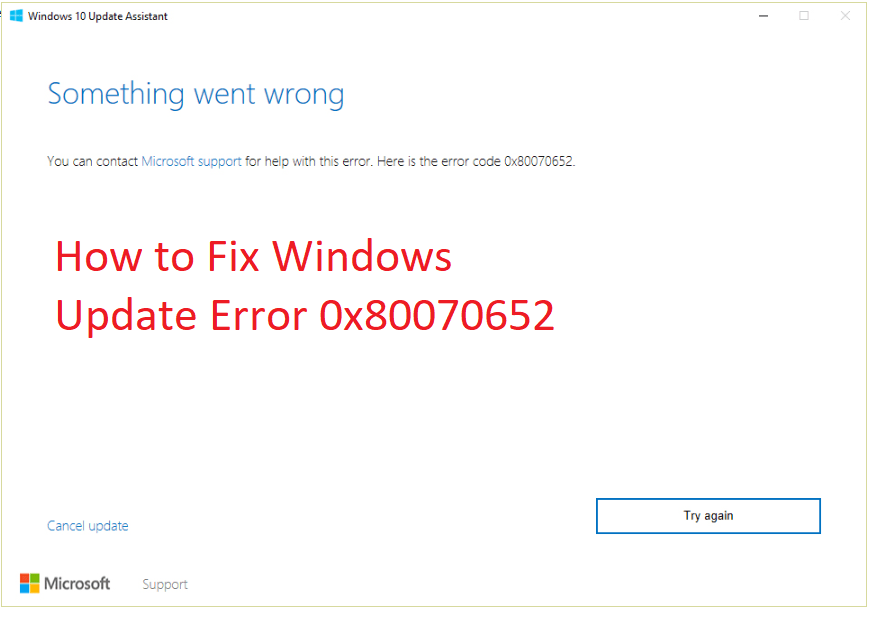
How to Fix Windows Update Error 0x80070652
How to Fix 0x800701b1 Which Easy Methods
When you understand the major culprits of the error 0x800701b1, it is now good to learn how to fix 0x800701b1 with quick methods and get back to normal functionalities.
Below are the main methods you need to follow and fix the error 0x800701b1:
Method 1: Perform a System Restore
When trying to fix the 0x800701b1 error code, you first need to consider performing a system restore. This is the simplest method on how to fix 0x800701b1.
The process will restore your computer’s system files, programs, and registry settings. To do this:
1. Press the Windows key on your keyboard and type “Create a restore point.”
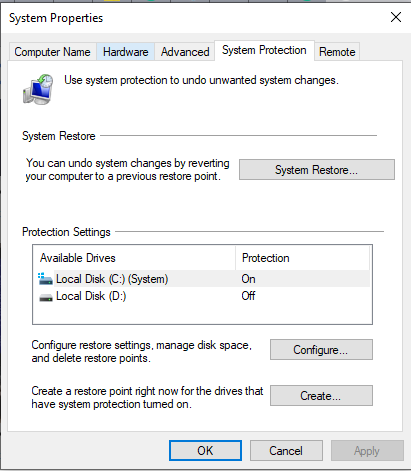
2. Click the Create a Restore Point option in the search results.
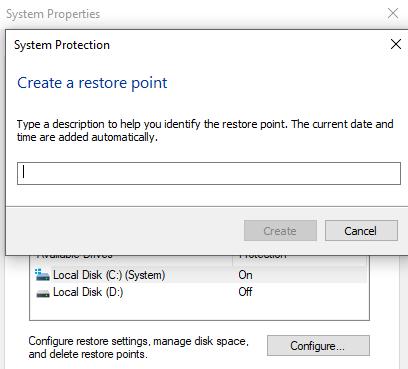
3. Select the System Protection tab and click “System Restore.”
4. Follow the instructions on the screen and save the restore point.
5. Reboot your computer once the restore is complete and see if the 0x800701b1 error code remains.
Method 2: Run a Disk Check
Disk errors can cause 0x800701b1 errors, so it is important to check them periodically using Windows’ native disk checking utility CHKDSK. To do this:
- Click Start > type cmd in the search box and press Enter on your keyboard (this will launch Command Prompt).
- Type chkdsk /f /r and press Enter on your keyboard (note that you should replace ‘/f’ with ‘/r’ if you want to repair bad sectors).
- Press Y when asked if you want to run CHKDSK next time the computer restarts and press Enter again for Command Prompt to continue running the disk check tool and repairing errors it finds during the process).

- Restart the computer after CHKDSK completes to scan and repair disk errors.
This should be enough to fix most 0x800701b1 errors, and you should reboot the computer again afterwards to ensure that the error code is no longer present.
Method 3: Update Drivers
Outdated or corrupted drivers can cause 0x800701b1 errors, so updating drivers may be the best appropriate way on how to fix 0x800701b1.
Drivers are pieces of software that control different hardware components, such as graphics cards, sound cards, and more.
To update your drivers, you can use a tool like Driver Easy to download and install your drivers’ latest version automatically.
You can also manually find, download, and install the latest driver versions from the manufacturer’s website. Below is a guide on how to do it perfectly:
1. Download and install the driver updates software like Driver Easy or Driver Booster from its official website (be sure to get it from a reliable source).

2. Run an initial scan to detect all outdated & corrupted drivers on your system; then follow their instructions to update those found drivers accordingly.

3. Reboot your computer to ensure the changes take effect and check if the 0x800701b1 error is fixed.
How to Update Drivers Manually
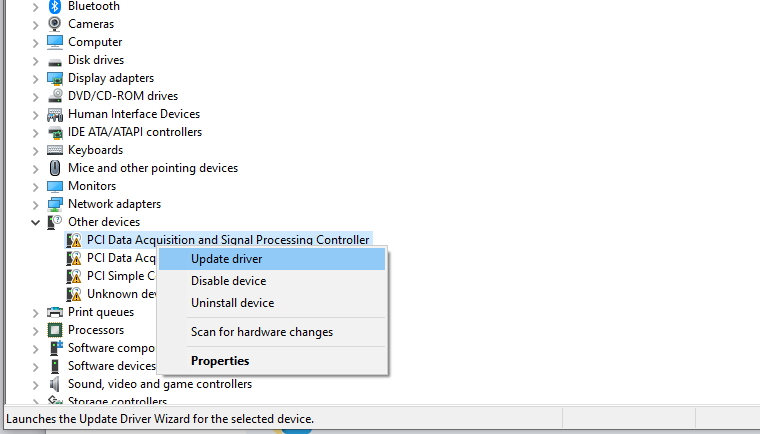
Updating drivers using Device Manager is a simple process. Here are the steps to follow:
1. Open the Start menu and type “Device Manager” in the search box.

2. Press Enter and find your hardware in the list.
3. Right-click on it and choose Update Driver (Windows 11/10) or Update Driver Software (Windows 8).
4. Select Search automatically for updated driver software, and Windows will search online for the latest version of your driver software.
4. If an update is found, follow the instructions to install it on your computer.
Method 4: Uninstall Recently Installed Apps & Software
Sometimes recently installed applications or software can conflict with existing ones causing 0x800701b1 error messages; uninstalling them may help resolve this issue – particularly if you have recently installed any unreliable third-party application or software package known for causing issues on systems (for example, untrustworthy toolbars). To do this:
1. Click Start > Control Panel > Add/Remove Programs

2. Browse through this list of installed applications & remove any of those you suspect could be responsible for causing 0x800701b1 errors -particularly those which were installed around the same date as when problems started appearing on your system

3. Confirm by clicking Remove when prompted by Add/Remove program wizard to finalize the uninstallation process of each selected app/software package in turn until they are all gone from your system completely
4. Restart afterwards (if prompted by Windows) to ensure the changes take effect and check if the 0x800701b1 error is fixed.
Method 5: Run the SFC Scanner
The System File Checker (SFC) is a utility in Microsoft Windows that allows users to scan for and restore corrupted Windows system files.
It can be used to repair missing or corrupted system files, which can help resolve various issues related to the operating system. This can be the best way on how to fix 0x800701b1 errors caused by corrupted system files. To run the SFC scanner:
1. Open the Command Prompt by typing “cmd” into the Windows Search bar and pressing enter. Once the Command Prompt window opens, type “sfc /scannow” and press enter.
This will initiate a scan of all protected system files and replace any corrupted files with a cached copy in a compressed folder.
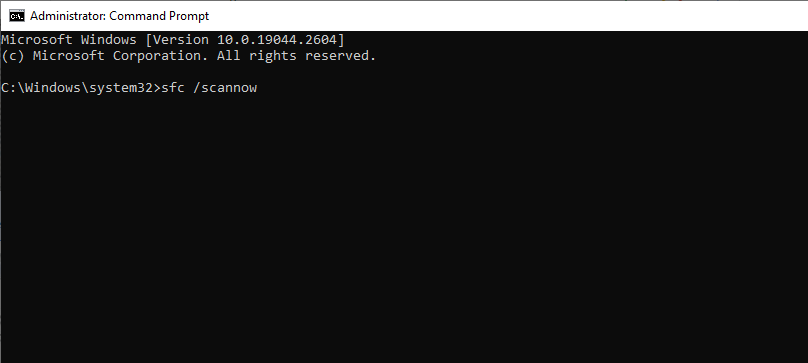
2. When the scan is complete, restart your computer. This should fix any 0x800701b1 errors caused by corrupted system files.
It is important to note that this process may take some time, depending on how many files need to be scanned and replaced. Additionally, if prompted for an administrator password or confirmation, type the password or provide confirmation.
Once the scan has been completed, you will receive a message indicating whether any issues were found and fixed during the scan. If no issues are found, your system should run smoothly again.
Method 6: Change the USB Port
If you’re trying to access an external device, such as a USB drive or external hard Drive, and you encounter the 0x800701b1 error code, try connecting your device to another USB port.
This may seem simple, but it can often be effective. Insufficient power or transfer speed from the USB port can cause the 0x800701b1 error code.

If your device is connected to an older USB port, it may need more power or transfer speed to complete the task. Connecting your device to a newer USB 3.0 port can provide more power and faster data transfer speeds, which could solve the issue.
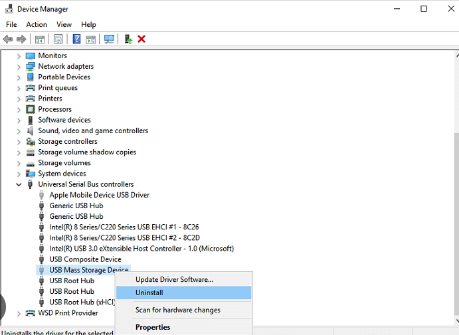
Method 7: Roll Back the Disk Driver
If you suspect an installed disk driver is causing issues on your computer, you may want to roll back the driver. Rolling back a disk driver in Windows 10 is an easy process that can be done in just a few steps. Here’s how to do it:
i. Press your keyboard’s Windows + X keys simultaneously and choose open Device Manager.

ii. Expand the category with the device you want to roll back the driver for.
iii. Right-click on the device and select Properties from the menu.
iv. Go to the Driver tab and select Update Driver.
v. Select Browse my computer for driver software > Browse and select the folder where you saved the driver file you want to install.

vi. Click Next and follow any additional instructions Windows provides until it finishes installing the driver and prompts you to restart your computer if necessary.
vii. Once your computer restarts, you should have successfully rolled back your disk driver!
Method 8: Check File System Errors
File system errors are disk-related errors that can prevent you from opening files. These errors can occur in PDFs, images, videos, and other documents.
File system errors can be caused by corrupted files, bad sectors, disk integrity corruption, or even hardware failure. You can try a few methods to fix file system errors in Windows 10 and 11.
Sol one: Run CHKDSK via CMD
Windows provide Command Prompt or CMD that can help you find and repair errors on the Hard Drive. Although using CMD requires some knowledge, running CHKDSK is relatively easy. You need to follow the below instructions:
i) Open the Start menu and type “command prompt” (or “cmd”) into the search box.

ii) Right-click on Command Prompt from the list of results and select Run as Administrator.
iii) Once you have opened an elevated command Prompt, run CHKDSK by typing chkdsk [Drive]: /f. Replace [Drive] with the drive letter you want to scan, e.g., C: Hit enter.

iv) Press Y when prompted to schedule a disk check on the next start-up and then press Enter
v) Restart your computer for the scan to begin
Sol two: Run CHKDSK via File Explorer
Running CHKDSK via File Explorer is a simple process that can help you check and repair any errors on your Hard Drive. Here are the steps to follow:
i) Open File Explorer by pressing the Windows key + E.

ii) Right-click on the Drive that you wish to scan and select Properties from the drop-down menu.

iii) Select Tools from the top of the window, then click Check under Error checking.

iv) A new window will appear with two options – Automatically fix file system errors and Scan for and attempt recovery of bad sectors. Select both options, then click Start to scan your Drive for any issues.

v. Once CHKDSK has finished running, it will display a report detailing any errors found and how they were fixed (if applicable).
Following these steps, you can easily use CHKDSK to check for any errors on your hard drive and repair them if necessary. This can help keep your computer running smoothly and efficiently!
Sol three: Use MiniTool Partition Wizard
MiniTool Partition Wizard is a powerful partition manager that can help you check your hard Drive’s file system. Here are the steps to check the file system with MiniTool Partition Wizard:
i. Download and install MiniTool Partition Wizard on your computer.

ii. Launch the program and select the hard drive you want to check from the Disk Map.

iii. Right-click on it and choose “Check File System” from the menu.

iv. A new window will appear. Click “Start” to begin checking your hard Drive’s file system.

v. The program will start scanning for errors in your hard Drive’s file system, and once it’s done, you’ll see a report of any errors found on your screen.
vi. If any errors were found, click “Fix Now” to repair them or “Ignore” if you don’t want to fix them right away.
vii. Once all errors have been fixed, click “Finish” to close the window and save the changes made by MiniTool Partition Wizard on your hard Drive’s file system.
With these simple steps, you can quickly check and repair errors in your hard Drive’s file system using MiniTool Partition Wizard! This powerful tool can help keep your data safe and secure while optimizing disk performance for better overall performance!
Method 9: Removing the Peripherals
Removing or unplugging peripherals is an effective way to solve Error 0x800701b1. Several issues, such as a faulty device driver or hardware malfunction, can cause this error.
To resolve this issue, disconnect any external devices connected to your computer and restart it. You may need to uninstall the device driver for the peripheral in question if the error persists.
To safely remove hardware from your Windows device, follow these steps:
i. Select Start > Settings > Bluetooth & devices > Devices

ii. Right-click on the peripheral you want to remove and select Uninstall Device
iii. Follow the onscreen instructions to complete the uninstallation process
iv. Disconnect the peripheral from your computer
v. Restart your computer
If you are still having trouble with Windows 0x800701b1 after removing peripherals, another underlying issue may be causing it that needs further investigation. You can find more information about troubleshooting this error in the following method.
Method 10: Try A New External Drive
It is essential to try a new external drive. This error usually occurs when your USB port lacks the required transfer rate or your power supply isn’t providing enough power to the device.
To fix this issue, try using a different external drive with a higher data transfer rate and more power output. USB 3.0 is recommended as it typically has a higher data transfer rate than USB 2.0, providing more power to connected devices.
If you don’t have access to a USB 3.0 port, you can use an external hard drive with an AC adapter instead of relying solely on the USB port for power. This will provide more power to your device and may help resolve the error code 0x800701b1.
It’s important to note that this error can also be caused by faulty drivers or corrupted files on your computer, so if trying a new external drive doesn’t work, you should check for any driver updates or run CHKDSK for the USB drive in question.
Method 11: Run HDTune
Finally, if you need a different solution, there may be an issue with your hard drive. To check this, download and run HDTune, which will scan your hard drive for any errors or issues that could be causing the 0x800701b1 error code.
Once it’s finished scanning, it will recommend how to fix 0x800701b1 or any other issues found on your hard drive so that it runs smoothly again without any errors appearing when accessing external devices or transferring files/folders.
You can also read: How to Connect AirPods to Dell Laptop
Conclusion
Error 0x800701B1 is a common issue that can occur on Windows 10 and 11 when trying to access or copy files from an external drive. Fortunately, the above methods on how to fix 0x800701b1 error codes can help you to encounter the error.
These include connecting the external device to a different USB port, rescanning the disks in Disk Management, updating or reinstalling the disk drive’s driver, running CHKDSK for the USB drive, and owning the file transfer process.
You can fix Error 0x800701B1 on your Windows PC with the above steps. If the issue persists, contact Microsoft Support or a qualified technician to get it fixed.