Thermal paste, that gooey stuff that comes in a tiny tube, is an unsung hero in computer cooling. It’s like the Swiss Army Knife of cooling technology, working tirelessly to keep your central processing unit (CPU) from overheating and crashing. But like any hero, thermal paste has its flaws. It can be challenging to apply, and if it accidentally gets on the CPU pins, it can cause all sorts of mayhem. If you caught yourself in that mess, you need to follow the below methods on how to remove thermal paste on CPU pins with ease.

What is Thermal Paste?
Thermal paste is like the peanut butter to your CPU’s jelly. It’s a high-heat-conductive compound that helps fill the microscopic gaps between your CPU and heatsink.
Doing so improves thermal conductivity and helps dissipate heat more efficiently. Most thermal pastes contain metal particles such as silver or aluminum, which enhance their thermal conductivity.

What Happens If You Get Thermal Paste on CPU Pins?
It’s like putting gum in your hair. When thermal paste gets on the CPU pins, it can cause them to short circuit, leading to computer crashes, freezing, or even permanent damage to your CPU.
Imagine your CPU like a tiny city; the pins are its roads. When thermal paste gets on the pins, it’s like pouring cement on the roads. It blocks the flow of traffic, and chaos ensues.
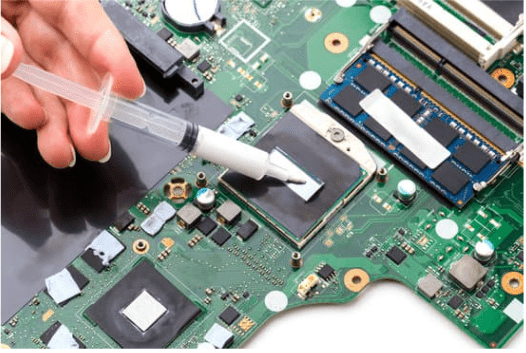
How to Remove Thermal Paste on CPU Pins
Removing thermal paste from CPU pins is like performing brain surgery on your computer. You need to be delicate and precise and keep everything in order. Here’s how you do it:
1. Apply 70% Isopropyl alcohol
If you find yourself in a situation where you need to remove the thermal paste from your CPU pins, don’t panic! There is a safe and effective solution using 70% Isopropyl alcohol.
To do this safely and effectively, you will need a few things, including 70% Isopropyl alcohol, a lint-free cloth, a soft-bristled brush or toothbrush, and some paper towels. Gather these materials, and let’s get started!

First, power off your computer and unplug it from the wall to avoid electrical hazards. Then, carefully remove the CPU from the motherboard by releasing the latch or lever holding it. Take your time and inspect the CPU for any damage, such as bent pins or scratches.
Now it’s time to apply the Isopropyl alcohol. Take a small amount and apply it to the lint-free cloth. Gently wipe the thermal paste off the CPU pins using a soft-bristled brush or toothbrush if necessary.
If there’s still some residue left, don’t worry! Just repeat the process until the pins are completely clean. Make sure to use a new section of the lint-free cloth each time to avoid spreading the thermal paste around.
Once the pins are clean, use a clean section of the lint-free cloth to dry the CPU thoroughly. You can also use a paper towel to blot any excess moisture. Finally, carefully reinstall the CPU into its socket on the motherboard, ensuring the latch or lever is securely in place.
And that’s it! Following these steps, you can safely and effectively remove the thermal paste from your CPU pins using 70% Isopropyl alcohol.
Remember, incorporating perplexity and burstiness in your writing can make your content more engaging and enjoyable to read, so don’t be afraid to mix things up a bit!
2. Using Thermal Paste Cleaners
Keeping your CPU running at optimal temperatures is crucial for maintaining its performance and prolonging lifespan.
One way to achieve this is by using thermal paste, a heat-conductive material that fills the microscopic gaps between the CPU and its cooling solution.
However, the thermal paste can dry out or become contaminated over time, reducing its effectiveness. Below we will discuss using thermal paste cleaners to remove the old paste and prepare your CPU for new applications.
Step 1: Gather the Required Materials
Before you begin, ensure you have all the necessary materials. You’ll need thermal paste cleaner, which can be purchased online or from your local computer store. We recommend using a high-quality cleaner that is safe for use with CPUs and has good reviews. You’ll also need a pair of Q-tips, a magnifying lens (if necessary), and a clean, dry cloth.
Step 2: Apply the Thermal Paste Cleaner
Using a Q-tip, apply a small amount of the cleaner to the affected CPU areas. Be careful not to use too much; starting with a modest quantity and adding more as needed is better. Let the cleaner sit on the CPU for at least 5 minutes to allow it to bond with the paste.
Step 3: Clean the CPU Pins
Using a clean Q-tip, gently brush the CPU pins to remove any excess paste. Be careful not to apply too much pressure or scrub too vigorously, especially if cleaning the popular AMD Ryzen CPU with fragile pins. Intel CPUs have a flat surface, so there are no pins to clean.
Step 4: Remove Any Remaining Liquid
After using a few Q-tips, the CPU may have some excess liquid. We use a fresh Q-tip to wipe away any remaining liquid, not leaving any residue or fibres behind.
Step 5: Check for Functionality
Once thoroughly cleaning the CPU, you should apply a new thermal paste and reattach the cooling solution. Power on your PC and check to see if it boots up properly.
If it does, congratulations, you’ve successfully cleaned your CPU! If not, try re-cleaning the CPU to ensure no paste residue is causing issues.
In summary, using thermal paste cleaners is an easy and effective way to maintain your CPU’s performance and prolong its lifespan.
Following these simple steps, you can remove the old, dried-out paste and prepare your CPU for a new application.
Remember to use caution when handling the CPU and to choose high-quality cleaners to ensure the best results. You can keep your CPU running smoothly for years with care and attention.
Why Use Thermal Paste on CPU?
Using thermal paste on your CPU is like sunscreen on a sunny day. It’s essential. Without it, air gaps would be between your CPU and heatsink, which would reduce cooling efficiency and cause your CPU to overheat and fail. Plus, your computer would be like a person sweating profusely in a sauna. Not a pretty sight.
Factors to Consider When Buying Thermal Paste
Not all thermal pastes are created equal. Here are some factors to consider when buying thermal paste:
Thermal conductivity
Thermal conductivity measures how well heat is transferred from one material to another. The higher the thermal conductivity, the better the heat transfer. Your heatsink will be able to cool your CPU chip and emit excessive heat.
Viscosity
Viscosity determines how easily the paste will spread and how long it will last. A higher viscosity means the paste will be thicker and more difficult to spread, but it will last longer than a lower-viscosity paste.
Longevity
The longevity of a thermal paste depends on many factors, such as temperature, humidity, and airflow in your system. Generally, a high-quality thermal paste should last at least two years in normal conditions. Choosing a product with good longevity is essential to use it sparingly.
Ease of Application
The ease of application of a thermal paste is also an essential factor when selecting one for your system. Some pastes are more accessible to apply than others, so read reviews or ask questions before purchasing. You want to ensure you can easily apply the thermal paste without issues or messes. Additionally, some pastes come with applicators which can make the application much easier and less messy than using your finger or other tools.
Types of Thermal Paste
The type of thermal paste you choose is important. There are two main types: organic and inorganic. Organic thermal pastes are made from synthetic materials like silicone and have good heat transfer properties but can degrade over time. Inorganic thermal pastes are made from metal oxides and other compounds, which provide better heat transfer but can be more expensive and difficult to apply.
Performance
The best thermal pastes will provide excellent heat transfer, allowing your components to stay cooler and last longer. Look for products tested and rated by independent sources such as Tom’s Hardware or XDA Developers for an unbiased opinion on performance.
Price
High-end products may offer better performance but are more expensive than budget options. Consider the cost of the product relative to its performance before making a purchase decision.
How to Apply Thermal Paste Correctly
There are several methods for applying thermal paste, but one of the most common methods is often called the “line method.” This is exactly as it sounds.
Apply a thin line of thermal paste directly onto the center of the IHS (Integrated Heat Spreader). Avoid manually spreading the paste, which can cause air bubbles and uneven coverage. Ensure you use just enough thermal paste to cover all areas without leaving any excess on top.

For AMD Ryzen 7000 processors, Noctua has shared guidelines for applying its latest NT-H2 thermal paste.
According to Noctua, you should only apply a very small amount of thermal paste, about half the size of a grain of rice, in order to achieve optimal performance. Spread it like the photo below before you re-attach the heatsink.

It’s important to note that different types of processors may require different amounts and techniques when applying thermal paste.
For example, Intel processors may require more thermal paste than AMD processors. Be sure to check with your manufacturer’s instructions or consult an expert if you need clarification on how much or what type of thermal paste should be used for your specific processor model.
Cleaning Up After Applying Thermal Paste
Once you’ve applied the thermal paste correctly, it’s important to clean up any excess material from around the processor and heatsink area using a microfiber cloth dampened with 99% Isopropyl Alcohol Solution. This will help ensure that there are no air bubbles or other contaminants on your processor or heatsink which could impede performance or cause damage over time.

Conclusion
Thermal paste is a crucial component of your computer’s cooling system. It helps improve heat transfer from your CPU to the heatsink and keeps your computer running smoothly.
However, it’s essential to be careful when applying thermal paste and remove any excess paste from the CPU pins. With the above steps on how to remove thermal paste on CPU pins, you will have the chance to solve your CPU performance and other slow components.